This recipe describes how to configure DNS(SEC) to include a TLSA record that acts as a different channel to provide verification for a self-signed x509 (SSL) certificate.
TLSA is still in an early stage of deployment. One of the road blocks that exists as of late 2016 is the lack of built-in application support in web browsers and mail applications. As these applications add support for TLSA, steps described in this recipe will become more relevant and practical. Today (as of late 2016), unfortunately, most applications lack native support and will likely result in some kind of error message or warning even if you have deployed TLSA correctly.
The Wikipedia page for DANE contains a list of current applications, libraries and plugins that provide TLSA support.
For this recipe, we are assuming that you already have a working web server configured with a self-signed x509 certificate. Although the steps described below works for self-signed certificates, it can also be used for "real" certificates that were signed by a Certificate Authority (usually a service you pay for). This is one of several possible uses of DNS-Based Authentication of Named Entities, or DANE (we briefly talked about DANE in the section called “Introduction to DANE”).
First, let's take a look at the certificate used by you web server:
# cat server.crt
-----BEGIN CERTIFICATE-----
MIICVTCCAb4CCQChk/gPoAqkWjANBgkqhkiG9w0BAQsFADBvMQswCQYDVQQGEwJV
UzELMAkGA1UECAwCQ0ExFjAUBgNVBAcMDVNhbiBGcmFuY2lzY28xITAfBgNVBAoM
GEludGVybmV0IFdpZGdpdHMgUHR5IEx0ZDEYMBYGA1UEAwwPd3d3LmV4YW1wbGUu
Y29tMB4XDTE0MTIwODA2MDMxNFoXDTI0MTIwNTA2MDMxNFowbzELMAkGA1UEBhMC
VVMxCzAJBgNVBAgMAkNBMRYwFAYDVQQHDA1TYW4gRnJhbmNpc2NvMSEwHwYDVQQK
DBhJbnRlcm5ldCBXaWRnaXRzIFB0eSBMdGQxGDAWBgNVBAMMD3d3dy5leGFtcGxl
LmNvbTCBnzANBgkqhkiG9w0BAQEFAAOBjQAwgYkCgYEAzovVMAexPZHg8MaL2xfE
IfwPKxCdcCzF2eEvl3euIk2esQ0r3GE+xEVqf/lggCC0OH0q6TXs+6XFYvc4+O/m
LEh6DFnfn8Kz3T0d6mG2l8YuhhkLLrwugvvaAcHqMoVeZRPqFLhlfaUsoGxb+CPs
3B8xYFisUqNJp6Tr26MhSVECAwEAATANBgkqhkiG9w0BAQsFAAOBgQC7lQbdSkaM
x8B6RIs+PMOZ14RlA1UcPNUPPAK0vK23/ie1SfxSHIw6PlOba+ZQZusrDRYooR3B
viM+cUnhD5UvhU4bn3ZP0cp+WNsimycf/gdfkAe47Em1oVNZP6abUgqMPStongIB
7uonP6j74A/BTF5kdUsaDPoDfvGnCjZMsQ==
-----END CERTIFICATE-----
Next, use openssl to generate a SHA-256 fingerprint of this certificate, this is what you will list in DNS as a TLSA record. Also, you need to remove all the colons, hence the added tr at the end to filter out all ":" characters:
# openssl x509 -noout -fingerprint -sha256 < server.crt | tr -d :
SHA256 Fingerprint=294874DA378148CDD1B9C57D2E891E8C294D2958F0BCA7400A0D6D6F50C4A3BB
Now you can insert the TLSA record by editing the zone file the old fashioned way, or if your DNS server is allowing dynamic updates, you could use nsupdate like this to inject the TLSA record:
# nsupdate
> server localhost
> update add _443._tcp.www.example.com. 3600 IN TLSA 3 0 1 294874DA378148CDD1B9C57D2E891E8C294D2958F0BCA7400A0D6D6F50C4A3BB
> send
> quit
Let's talks briefly about the record you just added. The name is a specifically formed "_443._tcp.www.example.com", which specifies the usage of TCP port 443, for the name "www.example.com". It is followed by three parameters, each representing usage, selector, and matching type. For this recipe, we will not dissect into all the possible combinations of these parameters. The examples listed here are 3, 0, and 1, which represent:
If you are interested in learning (a lot) more about the TLSA record type, check out "A Step-by-Step guide for implementing DANE with a Proof of Concept" by Sandoche Balakrichenan, Stephane Bortzmeyer, and Mohsen Souissi (April 15, 2013)
Assuming you have successfully added the new TLSA record and generated the appropriate signature(s), now you can query for it:
$ dig _443._tcp.www.example.com. TLSA
...
;; ANSWER SECTION:
_443._tcp.www.example.com. 3600 IN TLSA 3 0 1 294874DA378148CDD1B9C57D2E891E8C294D2958F0BCA7400A0D6D6F 50C4A3BB
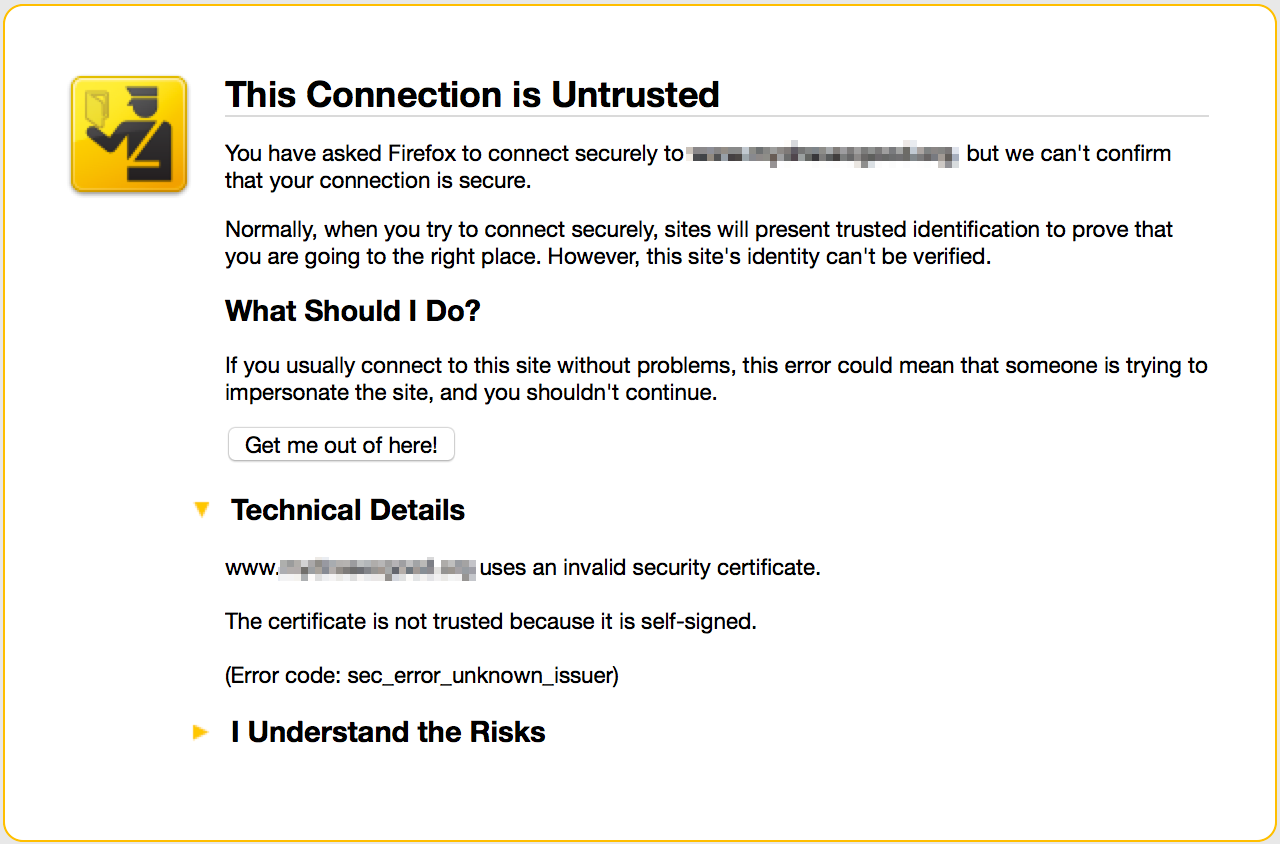
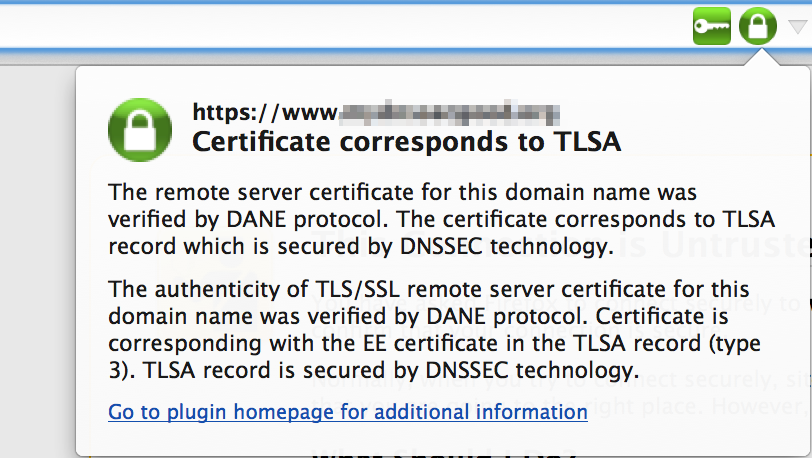
...Great! But that's still only half of the equation. We still need to make your web browser utilize this new information. For this recipe, we are showing you results of using Firefox with a plugin called DNSSEC TLSA Validator from https://www.dnssec-validator.cz.
Once the plugin is installed, activated, and Firefox restarted, when you visit the URL https://www.example.com, your browser will prompt you for a warning, because this is a self-signed certificate:
Although the certificate is not trusted by the browser itself (if you want to you'll have to install a custom CA root or make the browser trust the certificate individually), the plugin shows that it was able to verify the information it received via HTTPS (port 443), and that it matches the information it received via TLSA lookup over DNS (port 53).